A Test Mail Server for a PHP Docker Container
Posted on Jul 24, 2017. Updated on Jun 12, 2022
For a small PHP project, I created a Docker container with an Apache and PHP in order to ease local development and setup. But that was not enough because my PHP application also sends mails and I wanted to test this feature locally as well. That’s why I needed a local SMTP server for testing and integrate it into my current Docker composition. In this brief post, I show you how I achieved this.
Big Picture
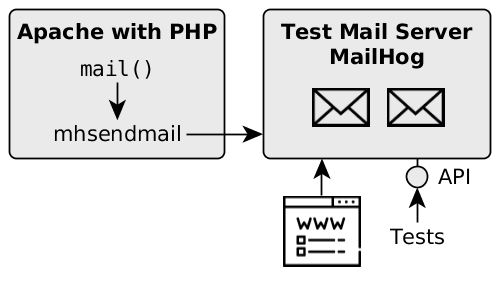
Mails sent by the PHP application should end up in the test mail server MailHog. The mails can be accessed via a Web UI or an HTTP API
The Test Mail Server MailHog
First of all, we need a small mail server that we can run locally. I decided for the great MailHog. It’s written in Go and therefore very fast and lightweight. It provides a really nice UI showing the mails I sent from my PHP application. Even better it provides an HTTP API that can be used in tests to check whether my PHP application has correctly sent the expected mail. That’s so neat and just works out of the box!
On Docker Hub, there is already a MailHog image available. So we only have to add it to our Docker-compose file:
version: '2'
services:
  # we'll talk about the php container in the next step
  apache_with_php:
    build: .
    volumes:
      - ./src:/var/www/html/
    ports:
      - "80:80"
  mailhog:
      image: mailhog/mailhog:v1.0.0
      ports:
        - "1025:1025"
        - "8025:8025"
Configure Sendmail in the PHP Container
Next, we have to instruct PHP to send mails to the MailHog container. Traditionally this is done by the SMTP client sendmail, which can be tricky to set up in a container. Fortunately, there is an alternative SMTP client coming from the MailHog developer: mhsendmail. So it’s no surprise that it works seemlessly with the MailHog server. mhsendmail is also written in Go. That’s why we have to install Go in our PHP container first. Second, we can install mhsendmail via go get. And finally, we set mhsendmail for the sendmail_path in the php.ini. We only have set the correct host and port of the test mail server. Using the docker-compose file above we can access the MailHog container with the host mailhog.
My final Dockerfile looks like this:
FROM php:7.0.19-apache

RUN apt-get update &&\
    apt-get install --no-install-recommends --assume-yes --quiet ca-certificates curl git &&\
    rm -rf /var/lib/apt/lists/*
RUN curl -Lsf 'https://storage.googleapis.com/golang/go1.8.3.linux-amd64.tar.gz' | tar -C '/usr/local' -xvzf -
ENV PATH /usr/local/go/bin:$PATH
RUN go get github.com/mailhog/mhsendmail
RUN cp /root/go/bin/mhsendmail /usr/bin/mhsendmail
RUN echo 'sendmail_path = /usr/bin/mhsendmail --smtp-addr mailhog:1025' > /usr/local/etc/php/php.ini
Starting both Containers and Send a Mail to the Test Mail Server
Create the PHP Docker image and start both the PHP container and the MailHog container:
docker-compose up # '--build' forces a rebuild of the Dockerfile
If our PHP application now calls mail() it will trigger mhsendmail which in turn sends the mail to MailHog.
<?php
mail("recipient", "subject", "message", "From: Sender");
The mail should show up in the MailHog UI under http://localhost:8025/. We don’t even have to refresh the browser!
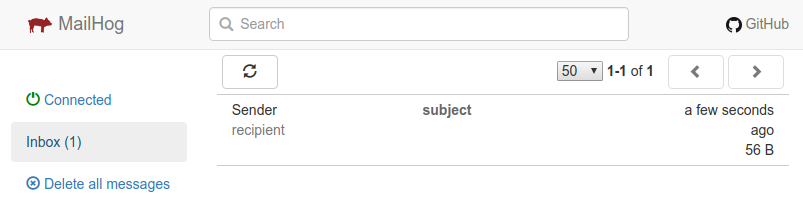
The MailHog UI shows the received mail immediately. No refresh required!
Moreover, we can consume the HTTP API of MailHog in our tests and verify that our PHP application has sent a mail correctly. The URL http://localhost:8025/api/v2/messages is a good starting point. It returns something like this:
{
    "count": 1,
    "items": [
        {
            "Content": {
                "Body": "message",
                "Headers": {
                    "From": [
                        "Sender"
                    ],
                    "Message-ID": [
                        "D9NcVZ9Ca9rtrRMtIhHen0e7Oo-cBaeXOj1dKr4TPmc=@mailhog.example"
                    ],
                    "Received": [
                        "from localhost by mailhog.example (MailHog)\r\n          id D9NcVZ9Ca9rtrRMtIhHen0e7Oo-cBaeXOj1dKr4TPmc=@mailhog.example; Sun, 23 Jul 2017 16:20:01 +0000"
                    ],
                    "Return-Path": [
                        "<www-data@70084ee6e6a1>"
                    ],
                    "Subject": [
                        "subject"
                    ],
                    "To": [
                        "recipient"
                    ]
                },
                "MIME": null,
                "Size": 56
            },
            "Created": "2017-07-23T16:20:01.47791444Z",
            // ...
        }
    ],
    "start": 0,
    "total": 1
}
More API documentation can be found here: APIv1 and APIv2.
Real-Life Example
I used the described approach in my project comment-sidecar. Check it out for the complete source code.